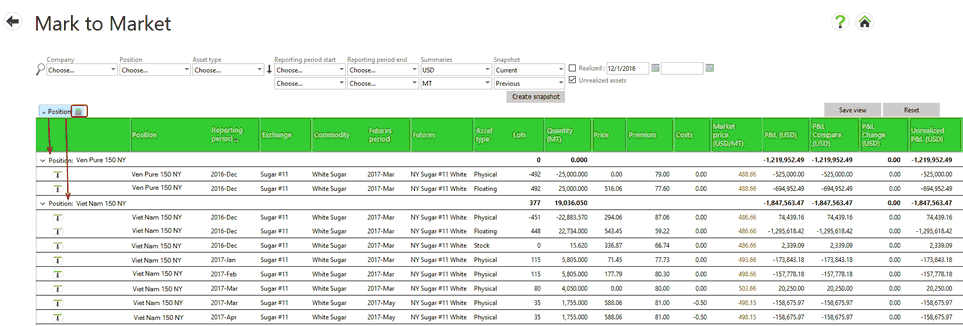
The Mark to Market screen can be filtered to select specific data by using the filter fields.

Filter Fields
These are located at the top of the Mark to Market table. Selecting an option in a field and then using the search button executes the filter. A filter can be reset by choosing other options or exiting the screen. The following filters are available and may be used in any combination:
| • | Company - all internal companies to which you have permission to see. |
| • | Position - all positions from Master data. |
| • | Asset type - all specific asset types including Floating, Future, Invoice, Option, OTC, Physical and Stock. Combinations of these asset types are also available: All derivatives, All physicals and Stock and floating |
| • | Reporting period start - Year and month to start filtering for a specific reporting period. |
| • | Reporting period end - Year and month to stop filtering for a specific reporting period. If nothing is entered, it will take the current year/month. |
| • | Summaries - allows you to select the currency and the quantity unit that will be displayed in the Mark to Market table. |
| • | Snapshot - Lists all available snapshots of P&L data that has been saved for a particular date. Two snapshot dates may be chosen for comparison. |
| • | Realized check box - includes realized data in any filter. The two date fields next to the check box may be used to define specific realized dates. |
| • | Unrealized assets check box - includes unrealized assets in any filter. This is the default filter type for the Mark to Market screen. |
Data Sorting
Data may be sorted (acceding/descending) by selecting a column header. A small triangle will appear in the column header indicating that the data is sorted on that column and in which way it is sorted. Selecting the column again will sort data in the opposite way. The the reporting period and future period are in chronological order, not alphabetical order.
Data Grouping
Data can be grouped by selecting and dragging a column header above the list. A blue tab will appear on top of the list and the data will grouped in the order of the tabs starting at the left. Groupings may be deleted by selecting the Delete button on the tab.

Saving a View
You may save a default view once columns have been selected and/or data has been grouped.
| • | Select Save View to store the columns in your profile to be displayed whenever you access the screen. |
| • | If different columns need to be displayed, use the Reset button to go back to the default column configuration and make changes. |