|
Agiboo has made the process of processing incoming invoices easier and less time consuming to use, especially when there are invoices that need many cost items to be allocated. The following changes have been made:
| • | Improved navigation between the incoming invoices table and individual incoming invoices |
| • | An improved filter section with more filters |
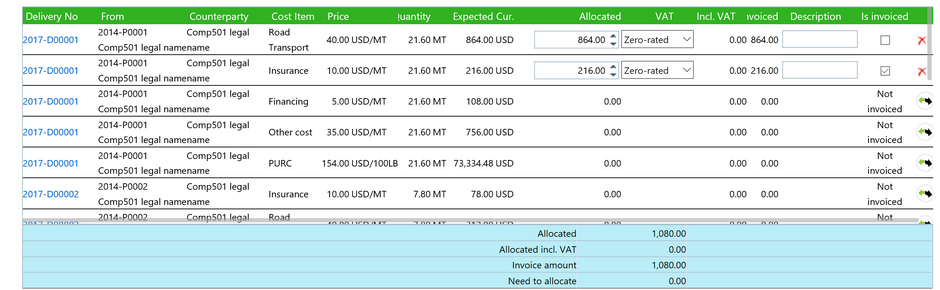
| • | A combined cost item selection table showing first all cost items with an allocation to this invoice and next all cost items matching the filter. |
| • | The button to allocate a cost item allocates it immediately. It takes default values for all required fields. Waiting time when allocating has been eliminated |
| • | Once allocated, cost items can be edited directly to change those default values without having to open and save a separate form. The need to apply these changes and wait has been eliminated |
| • | The allocated cost items have a delete button to de-allocate the cost item from the current invoice. The edited fields are then cleared and removed. Waiting time after removing an allocation has been eliminated. |
Improved navigation Between the Incoming Invoices Table and Individual Incoming Invoices
The Incoming invoices table, a tab on the Invoices screen, was improved to make navigation between this table and individual incoming invoices easier and faster.
| • | Before: after processing an incoming invoice, navigating back to the table would open the outgoing invoices tab and load data for all 3 tabs. This means to continue with more incoming invoices, users would need an extra navigation, and also wait for data on all tabs getting loaded. |
| • | Now: each tab on Invoices is a screen on its own, loading only its own data. So navigating back from an incoming invoice, will directly open the tab for incoming invoices and only load data for that tab. |
New Incoming invoice Screen
In the old incoming invoice editor, users had a less efficient procedure to allocate cost items to incoming invoices, requiring the following steps:
| 2. | Wait for the 2 lists of allocated and unallocated cost items being loaded |
| 3. | Enter filter details for unallocated cost items and press Search |
| 4. | Wait again for the unallocated cost items to be loaded |
| 5. | Find the right unallocated cost item |
| 6. | Press allocate button, to open a form |
| 7. | Enter various fields in the form |
| 8. | Press Update to apply this allocation |
| 9. | Wait again for the update being processed and the 2 lists being reloaded. See that the allocated item was moved to the separate list of allocated items |
| 10. | Continue at step 5 or 3 for more cost items |
| 12. | Wait until saving is done |
In the new incoming invoice editor, the procedure is more efficient
| 2. | Enter the filter details and press Search |
| 3. | Wait for the cost items being loaded (allocated at the top and unallocated items further down the list). |
| 4. | Find the right unallocated cost item |
| 5. | Press the allocate button to allocate it with default values |
| 6. | If needed, edit various fields directly in the allocated row (no form and no apply needed) |
| 7. | Continue at step 4 or 2 for more cost items |
| 9. | Wait until saving is done |
With this, 3 steps have been eliminated:
| ✓ | The initial waiting time after opening the editor |
| ✓ | The action to apply the allocation |
| ✓ | The waiting time after each allocation |
Also all allocated items remain editable so additional changes can me made quickly.
|